UNOFFICIAL GUIDE · Research checked August 13, 2026 · Current official patch at research: Version 1.0 (1618) · Mechanics observed in full-release recordings with no build number shown · Full mission spoilers
CAMPAIGN MISSION DOSSIER · UNOFFICIAL
IRON NEST Counter-Battery Mission Guide
Beat the IRON NEST Counter-Battery mission with a version-checked walkthrough, artillery location help, clear timer rules, and Star Shell troubleshooting.
Written and researched by Mia HePublished Updated Research checked
Quick answer
Yes—the IRON NEST Counter-Battery mission can be won. Before firing, plot all three opening guns and prepare three firing solutions. Destroy the active artillery in each of two observed counter-battery stages, then clear the remaining hostiles. The mission is complete only when the teleprinter reports Sector is clear and orders Iron Nest to stand down.
Stopping the Counter-Battery Timer ends the current artillery threat, not the whole mission. Two independent full-release runs show the same five-part progression, but neither displays an exact build.
Counter-Battery mission at a glance
Counter-Battery mission at a glance
Field
What to know
Mission
Counter-Battery, the fourth observed Campaign mission
Game
IRON NEST: Heavy Turret Simulator
Main objective
Destroy the active artillery in two stages, then clear every remaining hostile
Opening trigger
The first regular shell impact starts the opening Counter-Battery Timer
Final completion signal
All hostile assets destroyed, Sector is clear, and the order to stand down
Evidence scope
Two independent full-release runs, Demo-era developer explanations, official patch notes, and dated community reports
Version caution
The latest official patch at research was build 1618; the gameplay recordings did not show an exact build
The two observed runs used different spotter data, firing lines, and secondary artillery positions. Use your operation's information rather than copying another player's bearings, ranges, charges, or elevations.
Before you fire: prepare the opening battery
Do the slow work before the first impact creates time pressure.
The opening order explicitly tells you to restore the Master Power Switch to ON before proceeding. Set it to ON before you plot targets; the current build text does not establish a broader power-system, damage-lock, or timer mechanic.
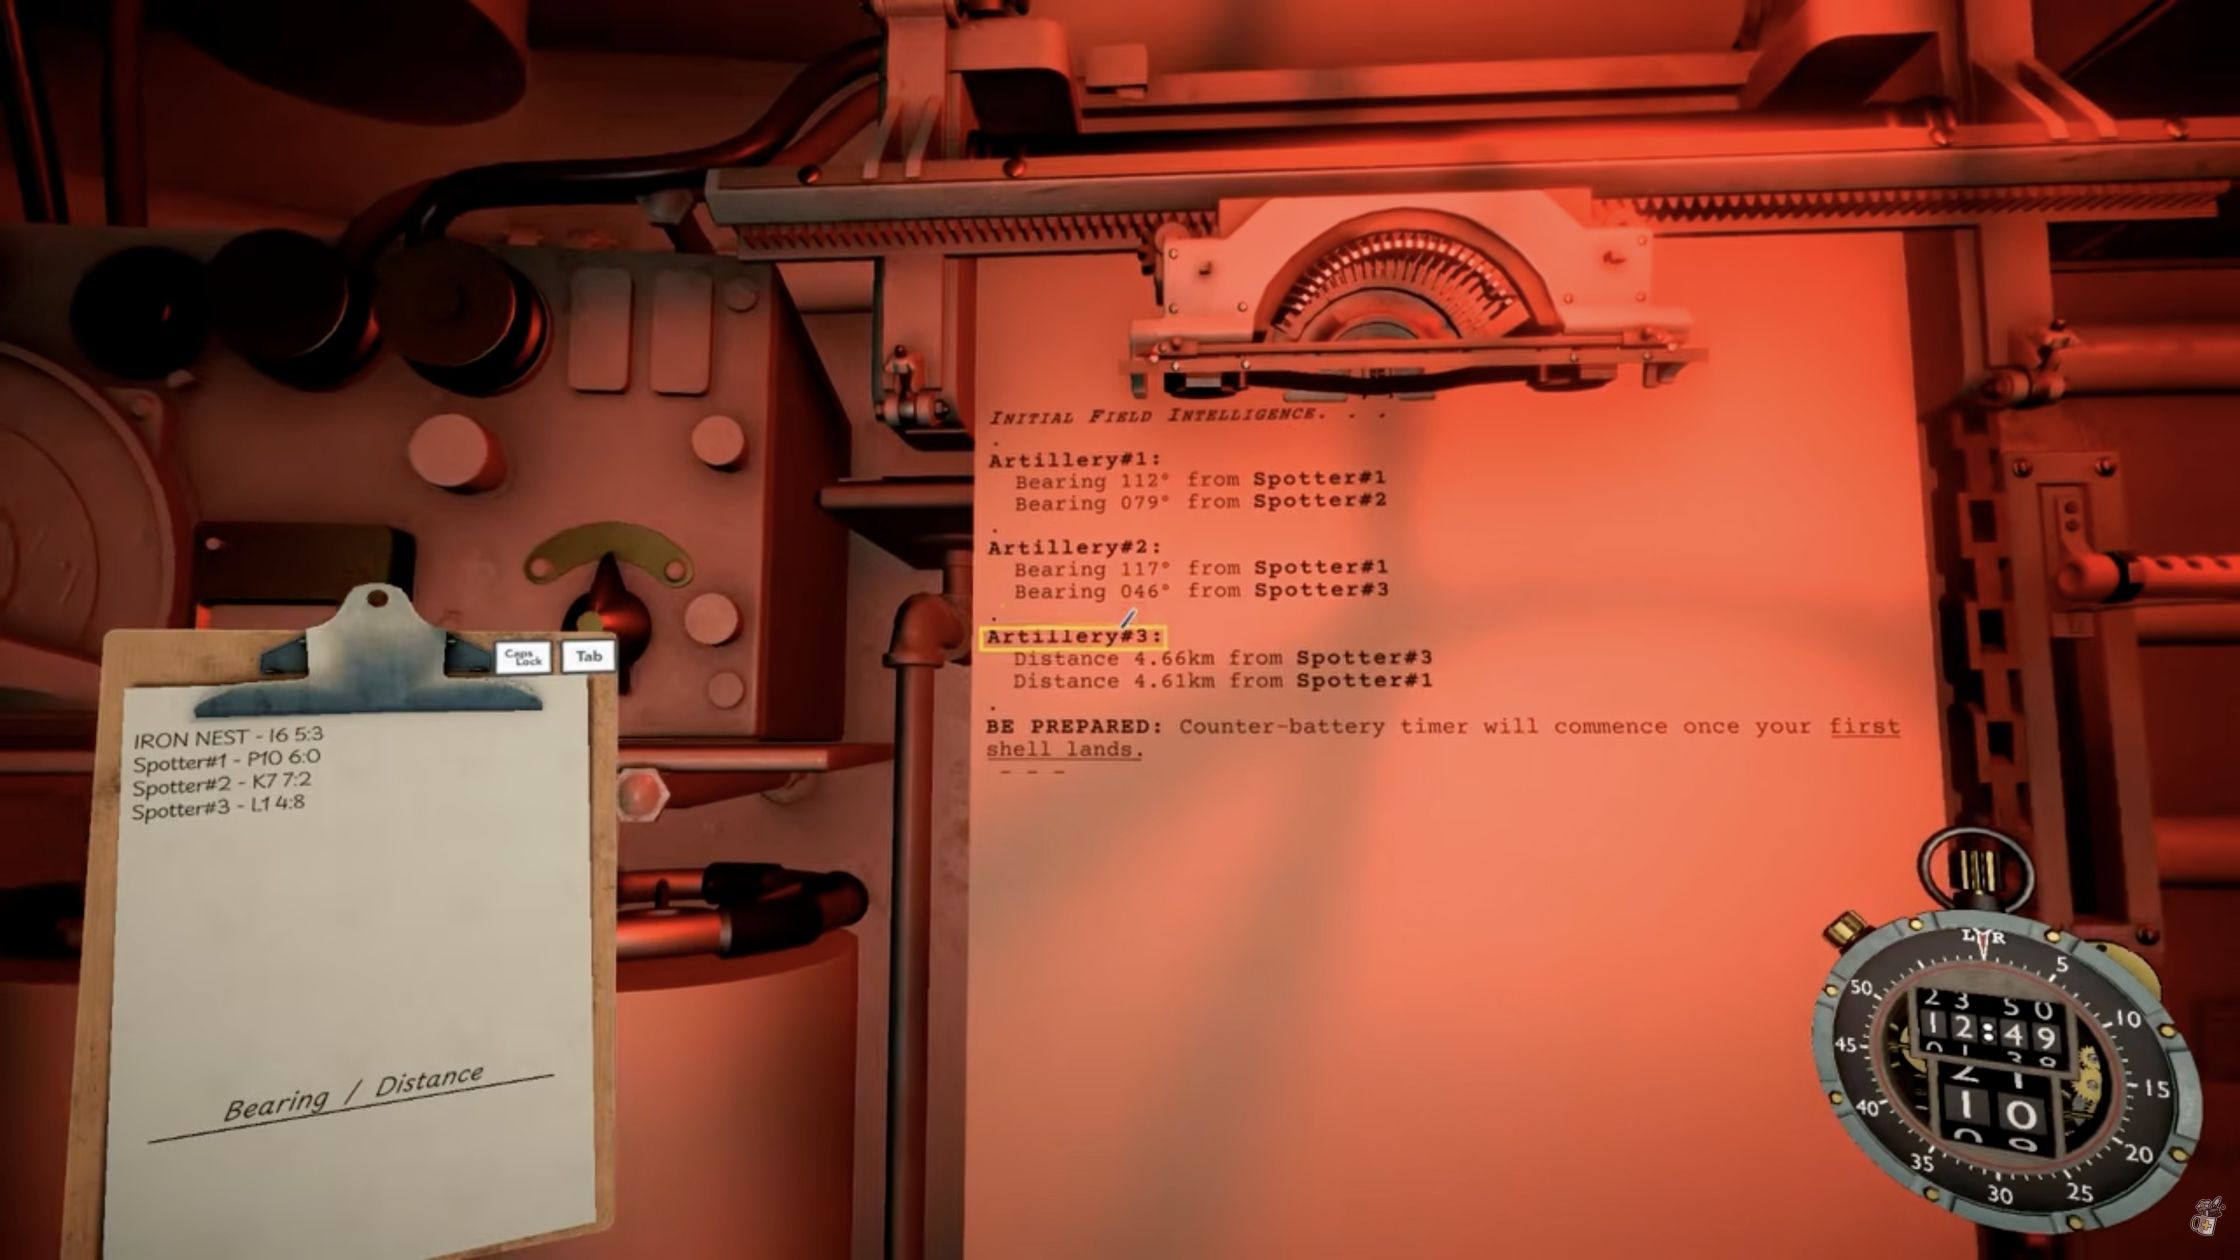
Read both teleprinter pages. Record Iron Nest, the three spotters, and every opening artillery report. The timer begins when the first shell lands.
Plot all three artillery positions. Use the current operation's reports. Verify ambiguous intersections; do not substitute coordinates from another guide.
Create three separate firing solutions. Keep the target ID, bearing, range, shell, powder charges, elevation, and assigned gun together. Match each card to the physical loader and elevation control.
Use both guns and the first shell's flight time. Choose an efficient sweep between your current bearings. Preloading both guns is reliable, but it is not the only valid firing order.
Keep resources for later. The first three guns are not the end. Reserve reconnaissance, ammunition, and powder for the secondary search.
Need a reusable workflow? Use the Triangulation guide to plot reported positions, the IRON NEST Calculator to compare charge and elevation solutions, and the Map field-data reference to identify tactical-map symbols. These tools do not provide fixed coordinates for this mission.
You are ready when three readable firing cards match the physical loads, elevations, and gun sides. There is no universal “best” shell or fixed left-to-right order.
Observed firing-card examples — do not copy these values
These full-release cards show complete solutions, not coordinates for your mission. Neither recording displays an exact build.
Observed firing-card examples — do not copy these values
Run A needed three AP solutions; Run B used different geometry and H shells, with one blast covering two guns. These are not fixed answers; calculate from your teleprinter and map.
Step-by-step IRON NEST Counter-Battery walkthrough
This structure was consistent in two independent full-release runs. Treat the counts as an observed Campaign pattern, not a promise for every future build. Follow the current teleprinter when it disagrees with an older guide.
Phase 1 — Plot the opening battery
Goal: Enter the timed phase with all three opening artillery targets solved.
Inputs: Your current Iron Nest location, three spotter reports, and the artillery bearing or distance information printed in the opening order.
Actions: Plot each target, draw its final line from Iron Nest, and record a complete solution. Assign every card to a gun or reload slot. Check the shell, charges, selected gun, bearing, and elevation before firing.
Stuff+ recorded run · 04:31 The opening teleprinter shows three spotters, three artillery reports, and the first-impact timer warning. Exact build not shown.
View original video at 04:31 ↗
Success signal: Three unambiguous cards match three prepared shots. You can identify which gun fires each solution without relying on memory.
If it fails: Use reconnaissance to resolve an unclear intersection while the opening CBT has not started. Never repair uncertainty by copying another run's coordinates; the available full-release recordings show different geometry.
Phase 2 — Destroy the three opening artillery pieces
Goal: Remove every active opening gun before the Counter-Battery Timer overwhelms the Nest.
Actions: Fire the first shot, rotate to the second solution, and use the first shell's travel time to fire or prepare the next gun. Continue into the third card without engaging ordinary targets. Keep every card paired with its gun side, charges, and elevation.
Destroying artillery adds time in the observed mission flow, but the available evidence does not establish one reliable current-build starting value or a fixed number of seconds per kill. Plan around confirmed targets, not an assumed timer total.
Success signal: The teleprinter reports the opening counter-battery assets destroyed, the current timer ceases, and four ordinary hostile units remain across the river in the two observed runs.
If it fails: If the timer continues, check whether all three artillery pieces received destruction confirmations. Ordinary hostile units do not control this phase's stop condition.
Phase 3 — Reduce the remaining force and wait for the new warning
Goal: Advance the mission until the secondary artillery actually enters the operation.
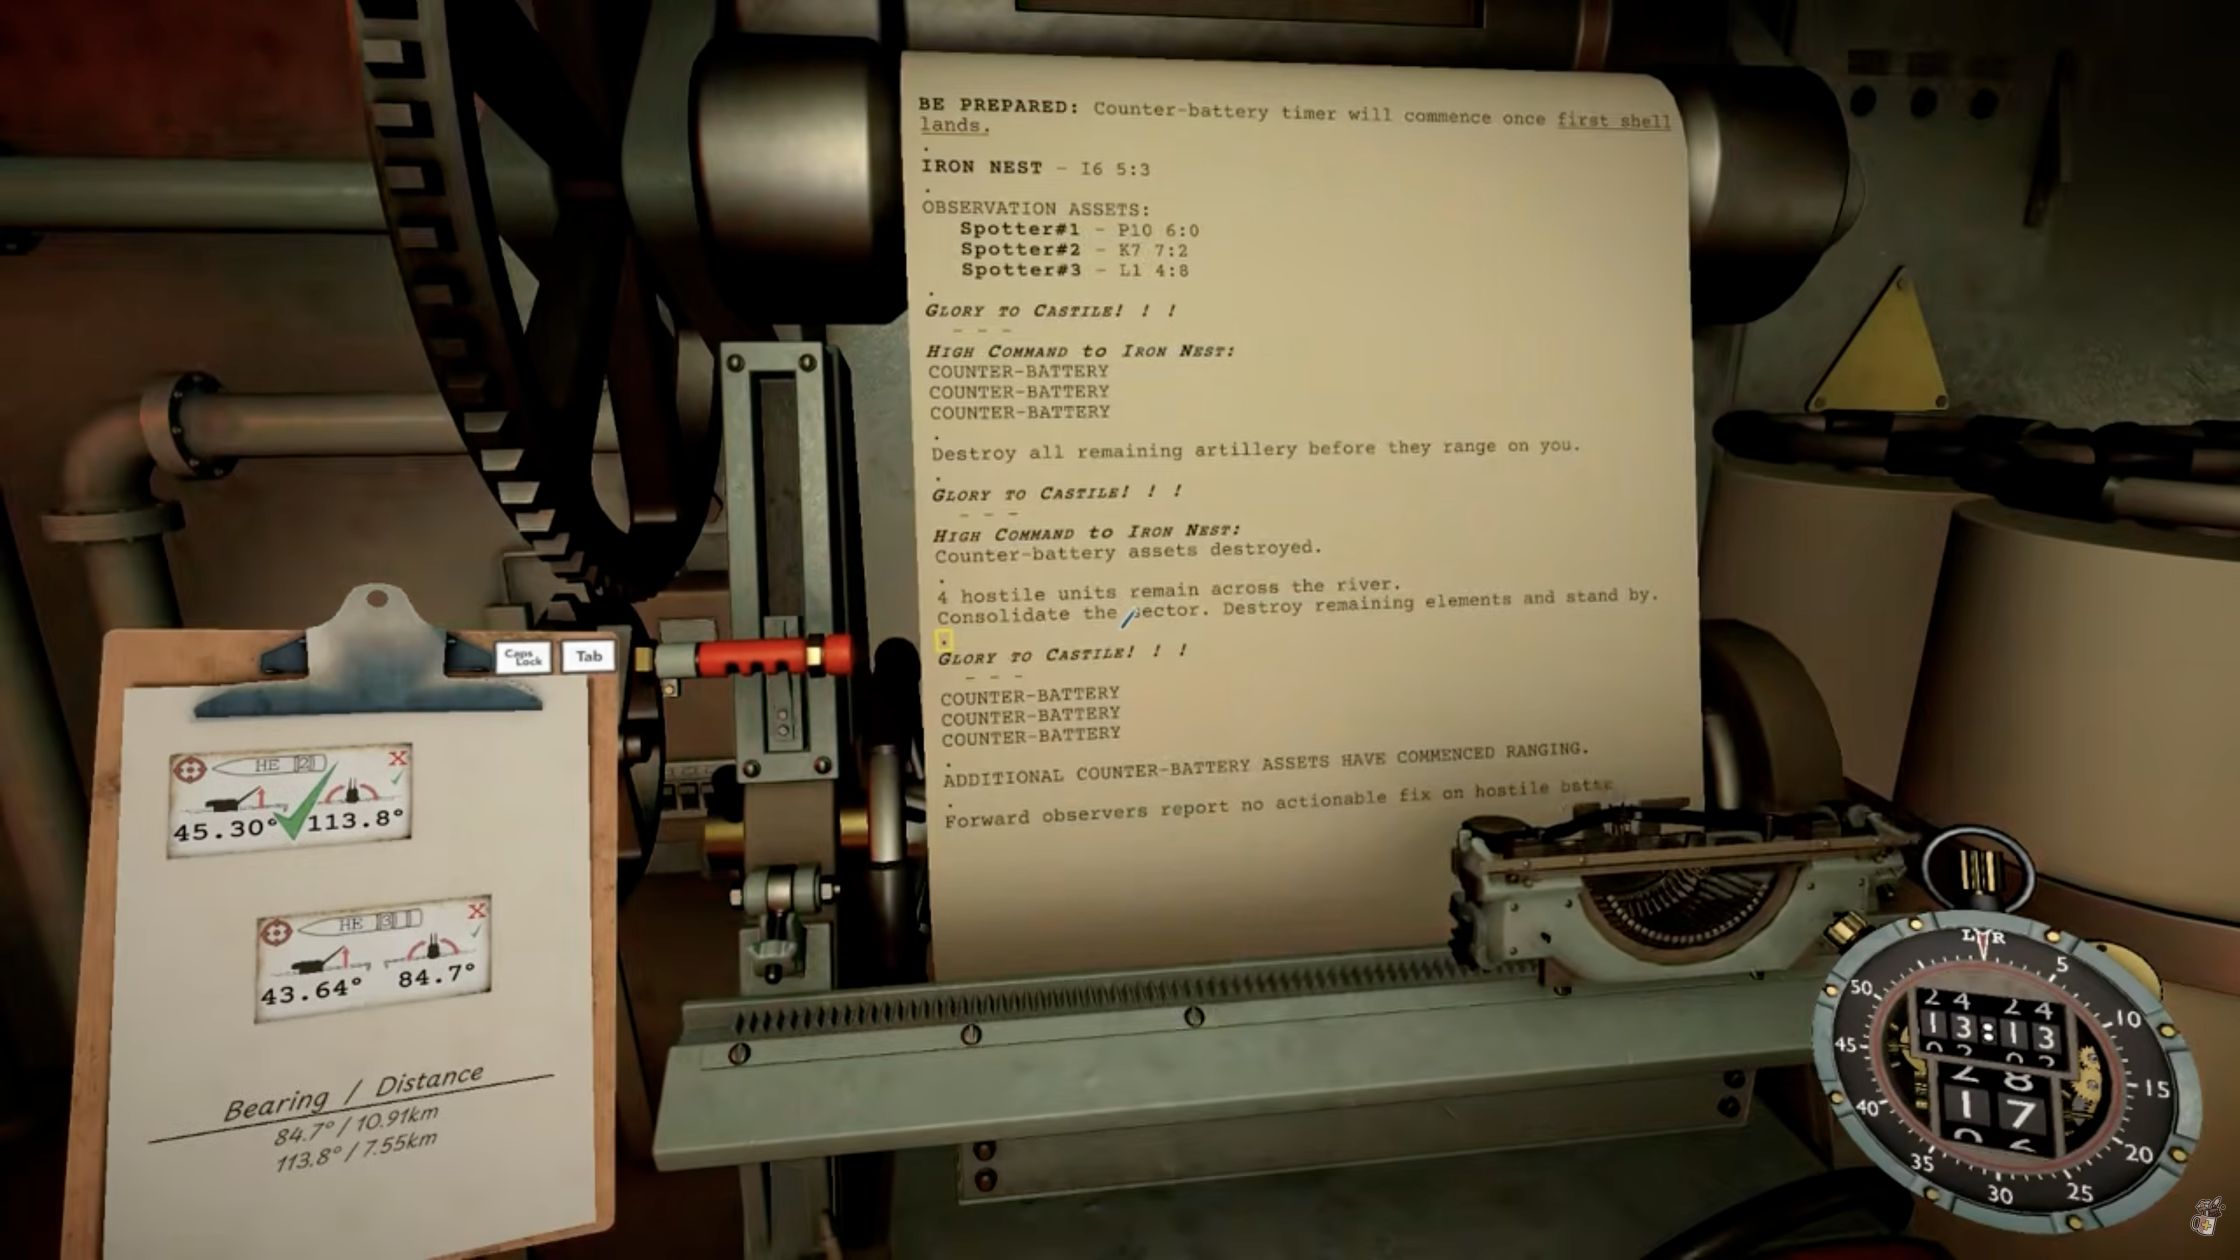
Actions: Clear obsolete markers and build new solutions for the ordinary hostiles in the latest reconnaissance. In both observed runs, destroying the first two produced a warning that additional assets were ranging, no actionable fix was available, prior reconnaissance was unreliable, and Star Shell was authorized.
Stuff+ recorded run · 28:48 The later warning says additional counter-battery assets have begun ranging and the previous reconnaissance is no longer reliable. Exact build not shown.
View original video at 28:48 ↗
Success signal: You receive that secondary-artillery warning. This is the point at which the new guns are relevant to your search.
If it fails: Do not search old photographs for artillery that had not spawned when those photographs were taken. Confirm the first two ordinary targets were destroyed and read the newest teleprinter pages before spending more reconnaissance.
Phase 4 — Locate and destroy the secondary artillery
Goal: Find the two randomly positioned secondary guns observed across the river/right side and stop the second CBT stage.
Actions: Check whether a fresh strip covers the likely area. If not, Demo-era developer guidance recommends using a Star Shell for yellow correction information, then sending a scout plane along that direction. Current player reports support this distinction, but it is not officially confirmed for build 1618. A plane must cross a spawned target to reveal it.
Create a new solution for every discovered gun. If a strip is empty, cover a non-overlapping area. Move old kill tokens or lines if they obscure the map; this was an acknowledged Demo issue, but its current status is unknown.
Success signal: The teleprinter reports Counter battery is ceased or that the secondary assets are destroyed, followed by two ordinary hostiles remaining in the observed runs.
If it fails: Verify that the secondary warning has appeared, that the photograph crosses the target area, and that you found both active guns. A stopped search is not proof of a bug.
Phase 5 — Clear the last hostiles and stand down
Goal: Complete the mission after the artillery pressure has ended.
Actions: Read the latest order, locate each remaining ordinary hostile with current information, build a separate firing solution, and wait for every destruction confirmation. Do not reuse a secondary-artillery card merely because the final targets lie in a similar direction.
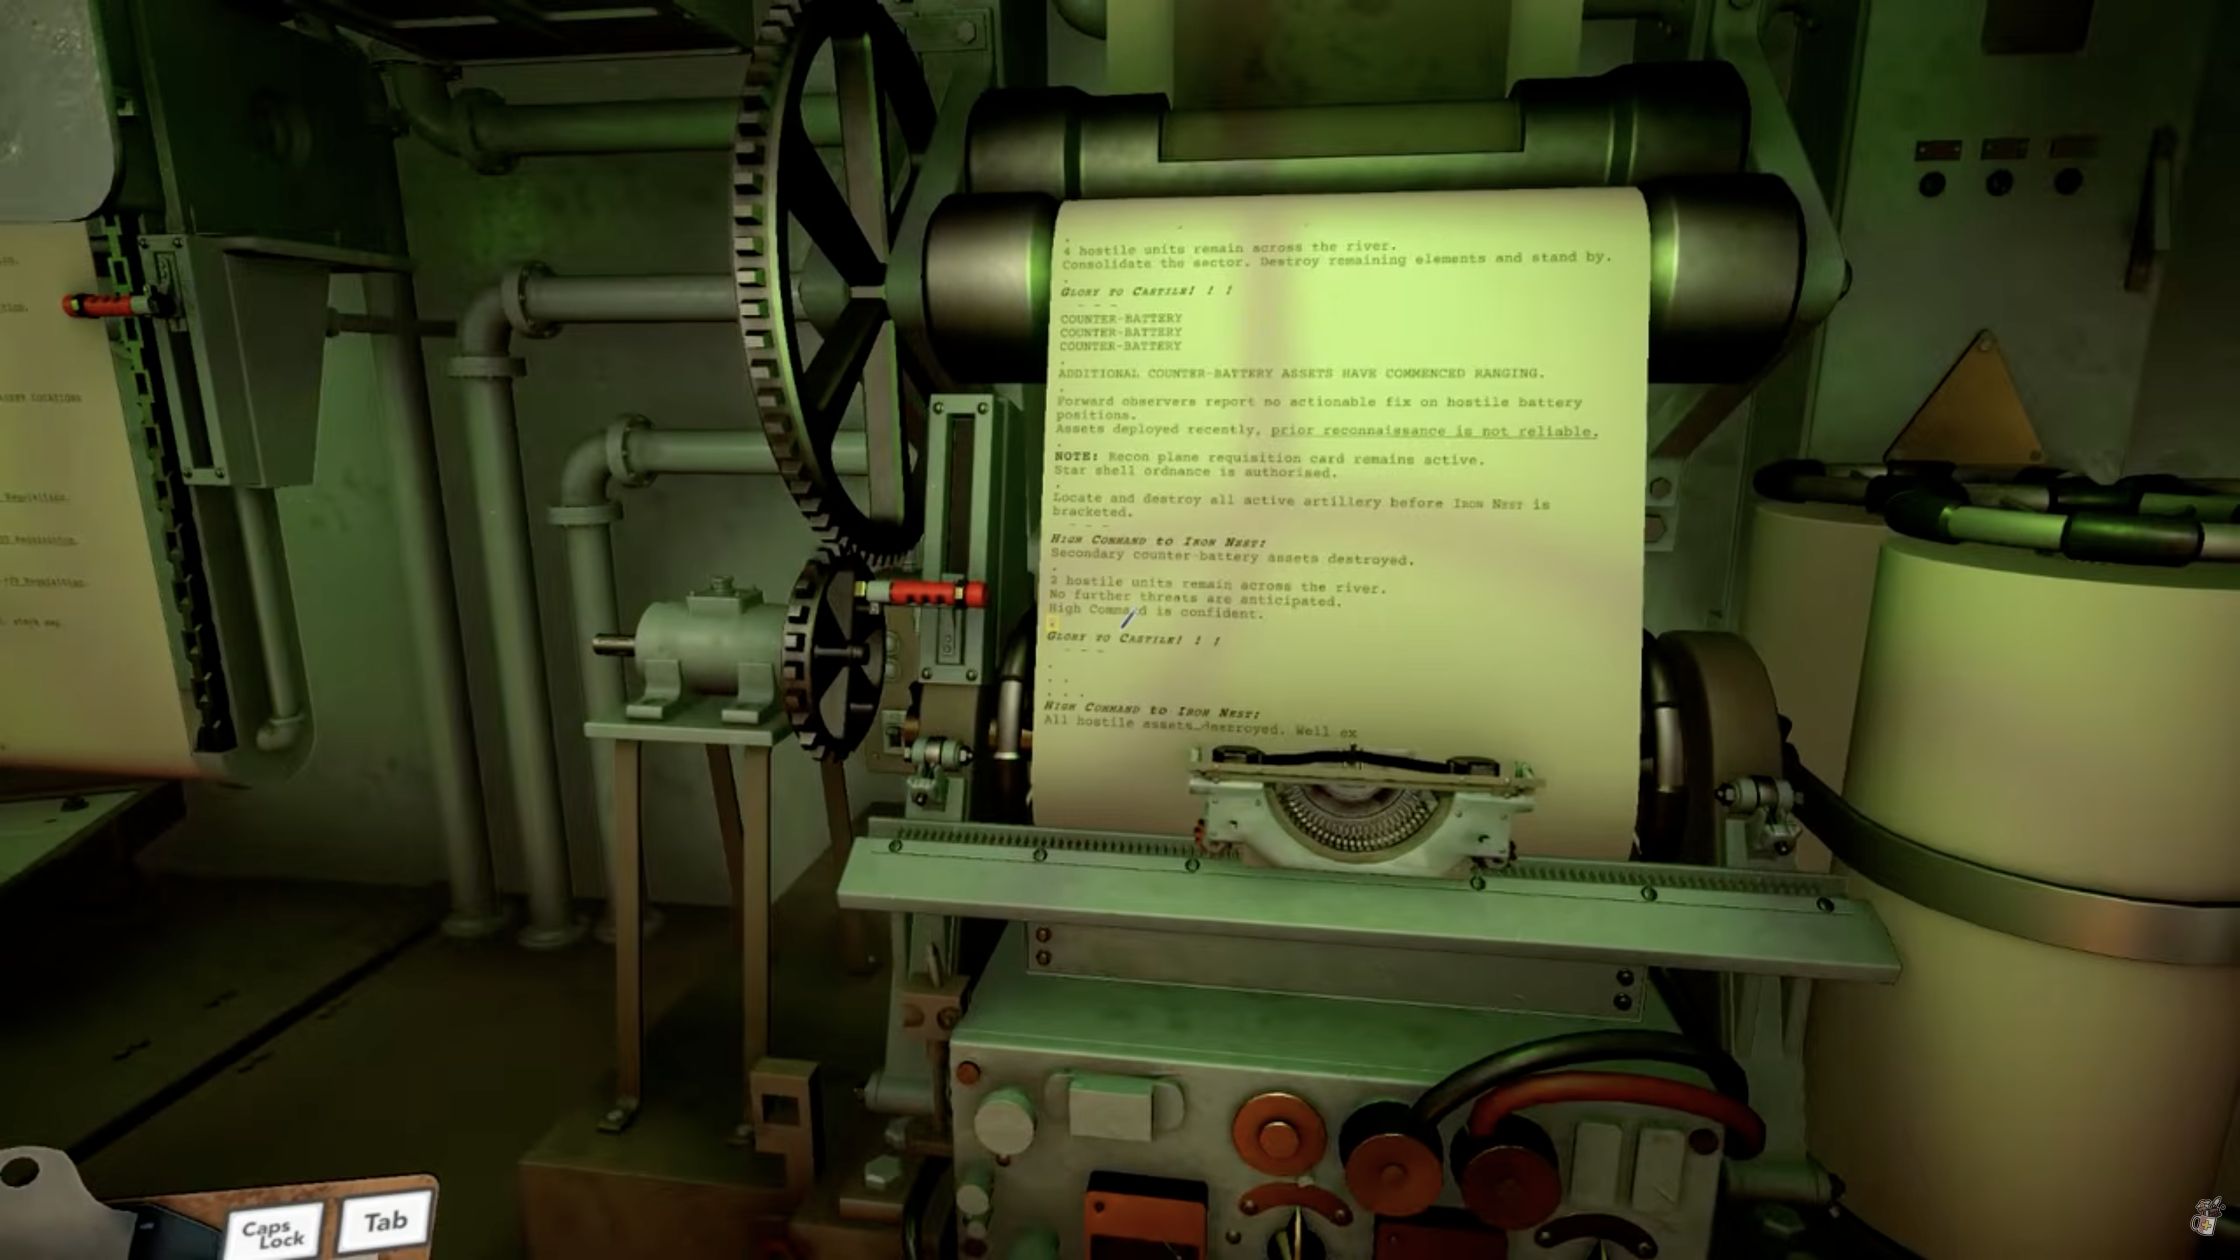
Stuff+ recorded run · 42:51 The final teleprinter sequence confirms that all hostile assets are destroyed before the stand-down order. Exact build not shown.
View original video at 42:51 ↗
Success signal: The teleprinter reports All hostile assets destroyed, Sector is clear, and orders Iron Nest to stand down. This—not Counter battery is ceased—is the Campaign completion state.
If it fails: Re-read the current order and inspect the remaining target icons. The most common mistake is treating the end of the second timer as the end of the mission while two ordinary hostiles are still active.
How to find Counter-Battery artillery without intelligence
If you searched for IRON NEST Counter-Battery without intelligence, begin with the mission phase rather than the map. The later artillery positions are not fixed, and reconnaissance captured before those guns spawn cannot reveal their future locations.
Has the secondary-artillery warning appeared?
No: Finish the current ordinary targets and read the latest orders. Do not search older photographs for future targets.
Yes: Treat all earlier photographs as historical coverage and continue below.
Does a fresh strip cover the opposite/right-side area?
Artillery icon visible: Plot a new firing solution from current-operation data.
No icon or ambiguous coverage: Use another source of information rather than repeating the same strip.
Need a direction?
Demo-era developer guidance says a Star Shell provides yellow correction information toward the current highest-priority hostile, but it also starts CBT.
Send a scout plane from the impact area along that correction direction. The same developer guidance and later player reports say the plane does not start CBT.
Still nothing?
Cover a new, non-overlapping strip.
Check that the photographic path actually crosses the suspected area.
Move old kill tokens and lines, then inspect the developed image again.
There is no single IRON NEST Counter-Battery location that works for every operation. Tie the search to the spawn warning and current reconnaissance. A blank old photograph means “not present at capture time,” not necessarily “the target is missing.”
IRON NEST Counter-Battery Timer: trigger, extension, pause, and stop
“Stop,” “pause,” “add time,” and “complete” describe different states. Use the current mode and teleprinter message before deciding that the Counter-Battery Timer is broken.
IRON NEST Counter-Battery Timer: trigger, extension, pause, and stop
Event
What the available evidence supports
Boundary
First regular shell fired in Campaign
Firing the lever is not the confirmed opening trigger
Two full-release orders identify impact instead
First regular shell lands
Starts opening CBT
Two full-release runs; no exact build shown
Active artillery destroyed
Adds time
Exact current seconds are unverified
Three opening guns destroyed
Stops opening CBT; mission continues
Four ordinary targets remained in both runs
Secondary warning appears
Starts the new artillery search phase
Follow the latest order; old reconnaissance is unreliable
Star Shell
Probably starts CBT and supplies yellow correction
Demo developer answer plus player reports; exact timing unconfirmed
Scout plane
Reported not to start CBT
Demo developer answer plus player reports; must cross a spawned target
Normal movement
Player reports say it does not stop CBT
Primarily a Challenge troubleshooting issue, not an official current rule
Emergency Move
Current Challenge reports describe a pause, not permanent disable
Campaign availability and exact added time are unverified
Every active artillery piece destroyed
Stops the current timer stage
Mission completes only after every hostile is gone
Published numbers conflict: a guide reports 300 opening seconds, a Demo developer answer described eight minutes later, and a community post claims Emergency Move adds 120 seconds. None is a verified universal current value.
Does Star Shell cause Counter-Battery in IRON NEST?
Probably yes. A June 2026 Demo developer answer says Star Shell starts Counter-Battery and gives yellow correction toward the highest-priority hostile. An August full-release player report agrees; impact timing remains unofficial.
Use Star Shell when direction is worth the timer risk. If you know which strip needs coverage, available reports favor the scout plane: it covers a wider path without starting CBT, but cannot reveal an unspawned or uncrossed gun.
Why Emergency Move may not stop Counter-Battery
Can you move the Iron Nest? Yes—in the documented Demo and Challenge contexts, movement uses a requisition card rather than continuous driving. A developer answer describes Tactical Movement and Emergency Move as separate cards with different side effects; current full-release Campaign availability remains unverified.
IRON NEST Emergency Move does not stop Counter-Battery usually describes Challenge mode. Player logs show COUNTER-BATTERY TIMER PAUSED and relocation to an unknown position—not permanent disable.
After any relocation, update the Iron Nest marker and treat the old firing line as stale. If the new position is unknown, use Position Reports to rebuild it, then measure a fresh bearing and range and recalculate charges and elevation. The Phantom Battery rules table shows that mission-specific rebuild sequence.
Confirm the movement card and success log, account for events in flight, and check whether another shot exposed the new position. Campaign availability, cost, reuse rules, and +120 seconds are unverified.
Troubleshooting by symptom
“I have no intelligence”
Wait for the secondary warning; otherwise clear the current ordinary targets. Then use fresh, non-overlapping reconnaissance and accept Star Shell's timer risk only when needed.
“I cannot find the last artillery unit”
Check spawn timing, the latest orders, right-side coverage, and whether the scout path crossed the suspected point. Clear old tokens. Obstruction is an old-Demo issue, not a confirmed build 1618 bug.
“The Counter-Battery Timer will not stop”
Separate Campaign from Challenge. In Campaign, confirm every active gun in the current stage was destroyed. Ordinary enemies affect mission completion, not the artillery stop condition.
“Star Shell started Counter-Battery”
This is expected in the available evidence: a Demo developer answer and later player report agree. Prefer a scout plane when the required coverage is already known.
“Emergency Move did not stop it”
Expect a Challenge pause, not permanent disable. Verify the card, success log, in-flight impacts, and shots fired after relocation. Normal movement is a separate action.
“The mission will not complete”
Do not stop at Counter battery is ceased. Read the next teleprinter line and clear the remaining ordinary hostiles. Completion requires All hostile assets destroyed, Sector is clear, and stand-down.
“I scouted everything and nothing appeared”
Pre-warning photographs cannot show unspawned artillery. After the warning, cover a different strip and check for markers hiding the icon.
Common mistakes to avoid
Firing with only one solved target: finish all three opening solutions before the first impact.
Watching the first shell travel: use that window to fire or prepare the next gun.
Copying bearings or coordinates: target geometry changes between operations.
Mixing a card with the wrong physical load: Run B's 5.50 km / 96.4° / 2 charges / 33.00° card missed when loaded with 3 charges, then hit after the load was corrected to 2.
Spending all requisition on the opening stage: later artillery may require fresh reconnaissance and ammunition.
Searching reconnaissance captured before spawn: wait for the secondary warning, then take new coverage.
Confusing normal movement with Emergency Move: current reports describe different Counter-Battery effects.
Standing down when the timer stops: wait for Sector is clear and the final order.
Campaign mission vs IRON NEST Counter-Battery Challenge vs Demo
Campaign mission vs IRON NEST Counter-Battery Challenge vs Demo
Mode or version
What this guide can say
What should not be carried across
Full-game Campaign
A winnable five-phase mission in two observed runs; first regular shell impact starts opening CBT; Sector is clear completes the mission
Do not assume the recordings show build 1618 or that Challenge movement cards are available
Counter-Battery Challenge
A separate maximum-kills context; the observed menu says counter fire begins with the first shot
Do not apply Campaign phases, target counts, or Sector is clear as its victory condition
June 2026 Demo
Developer answers explain randomized artillery, Star Shell, scout planes, and movement-card history
Do not present Demo timer values or behavior as current full-release official rules
Current Demo Counter-Battery status
Availability is unverified; a June 30 official Demo patch said that build had no timed-impact or time-critical missions
Do not claim the current Demo and full game contain the same mission
Campaign remains the primary answer. Challenge and Demo evidence appears only where it resolves a common query or prevents a version mistake.
Frequently asked questions
Is the Counter-Battery mission possible to win?
Yes. Two independent full-release runs end with All hostile assets destroyed, Sector is clear, and an order to stand down. Stopping either artillery timer is only a phase result; it is not the mission victory signal.
How do you find enemy artillery without direct intelligence?
Wait for the secondary warning so you know the guns have spawned, then collect fresh reconnaissance. Demo developer guidance recommends using Star Shell correction to choose a scout-plane direction, while later player reports support the same trigger-risk difference. Never depend on another run's coordinates.
Does firing a Star Shell start the Counter-Battery Timer?
Probably yes. A Demo developer answer says it starts CBT and supplies yellow correction information; an August full-release player report agrees. The exact current-build impact timing is not officially confirmed.
How do you stop or disable Counter-Battery?
In the Campaign, destroy every active artillery piece in the current phase. Three opening guns stop the first timer and two observed later guns stop the second. You still need to destroy the ordinary hostiles to finish the mission.
Why did Emergency Move not stop the timer?
Current Challenge player reports describe Emergency Move as pausing Counter-Battery, not permanently disabling it. Confirm the correct card and success log, then account for events already in flight and any shot that exposed the relocated Nest again.
Is Counter-Battery the same in Campaign, Challenge mode, and the Demo?
No. Campaign is the winnable mission described here; Challenge is a separate maximum-kills mode with a different trigger context. June developer answers belong to the Demo, and the current Demo mission menu has not been verified.
Sources and version notes
Sources are separated by version and evidence type:
Full-release observations:Stuff+'s recorded run and QuadThumb Gaming's independent run show the same broad phase sequence and final Sector is clear signal with different operation data. Neither video displays an exact build.
Community: August 2026 Discord reports support the recon and movement distinctions; they are not official build 1618 rules.
Demo boundary: The June 30 official Demo patch said that Demo build did not contain timed-impact or time-critical missions. It does not establish the current Demo menu.